Monday, April 16, 2012

HANDLEBARS! And the Storm Before the Calm

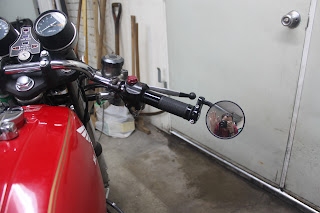
Now that the throttle is re-built, the first thing I wanted to do this week was get the new grip onto the throttle and fit the mirror on the right side of the handlebars.  Having done the left side of the handlebars already, I completed the right side relatively quickly.  I was so excited to have the handlebars done that I immediately took pictures.


And waved at the camera in some of them.


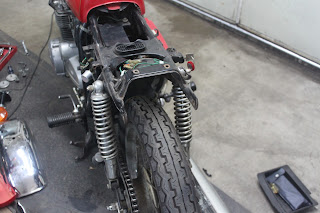
With the handlebars done the next step was to start taking off some of the pieces which will not be part of the bike when it is done.  I started with the back blinkers.  The wire which controls the blinkers unplugs under the seat and is pretty simple.  I also took off the back fender which will be modified to mount the new tail light and protect the new tail section.


While I was there I also removed the chain guard, which will also stay off of the bike.


I admit that I was concerned about how the bike would look without blinkers, or even the chain guard.  But seeing the bike without those items made it look much more sporty and streamlined.

The back blinkers were easy because they are simply bolted to the frame and I had removed them once before when I polished the back fender a couple of weeks ago.  The front blinkers were a totally different mess.

They are bolted onto a bracket which is in turn bolted to the frame of the bike.  We can't lose the bracket entirely because it also holds the headlight and the gauge cluster.  but we had to remove the bracket temporarily because the blinker wires run through the tubes making up the bracket and into the headlight.

For those of you who don't know, EVERYTHING is wired through the headlight.  If you take off the headlight, you see a whole spaghetti bowl of wires (not all of which are pictured below).


But I can't just start disconnecting wires because at some point I have to re-connect the wires (not including the blinkers).  So I made notes of the wires I disconnected for when I had to re-assemble.  Eventually the headlight came out and I unbolted the bracket.


Next we're going to cut the "U" portion of the bracket away from the bar going across the bottom (which used to hold the front blinkers).  Then we'll fabricate a new tab, like the one at the bottom  of the cross bar, which we will weld directly onto the "U" shaped portion.  That way we'll maintain the portion of the bracket which holds the headlight and gauge cluster, and still be able to bolt it back onto the frame, but we won't have the empty cross bar.

Here are the parts that came off today.  The blinkers and chain guard will stay off, but the headlight will go back on.


That chain guard is pretty beat up.

Since the headlight had to be removed anyway, I took the opportunity to re-paint the plastic casing which holds the headlight.  I will also sand blast and re-paint the bracket which holds the headlight and gauge cluster.  When it is done the whole front end should look clean and new.

Eric (correctly) noted that it may seem like we still have a mountain to climb, but he assures me that we are closer to complete than it seems.  Sometimes, things have to get messier before they can get clean.  Right now is the storm before calm.  The front end is disassembled and more parts are off the bike than have ever been before, but we're close to putting all those things back together, and when we do it will look better than ever.

Thursday, April 5, 2012

Taking Shape

This week I received two important parts to making significant progress on the bike - the new tail section and the new tail light assembly.


As you can imagine I was very excited to get back into the shop and see how these parts fit onto the bike.  I also wanted to get the throttle rebuilt and finish off the handlebars.  Unfortunately, I also needed to go into work on Saturday, so I only had a few hours to get things done.

In order to start mocking up the new tail section I first needed to remove the old seat.  This was relatively simple.  The seat unlocks from the right side of the bike (the side with the brake controls) and opens like the lid of a trunk, with the hinge on the opposite side of the bike.  From there one removes the pins holding the hinge together and the seat lifts off.


I was eager to see how the bike would look with the new tail section and I wanted to know what issues I would have when it was time to attach the new tail section to the bike.  The first problem was anticipated and obvious.  The old tail light had to go.


I started looking for the bolts which held the tail light in place and also started looking for the wires that needed to be unplugged.  It turned out that those were under the seat, so I had to work the wiring back out through the back fender to get the tail light completely unhooked.

Once the tail light was gone the new tail section rested on the bike perfectly.  For the first time the new profile of the bike came into focus.


Like much of the chrome on the bike, the rear fender was a little tarnished.  Having already removed the tail light I knew it would be easy to unbolt the rear fender and give it a bit of attention.  This is how it looked when I first removed it:


I did two things to refurbish the fender.  First I took a little WD-40 and steel wool to clean up the chrome.  Next I used the sand blaster to get rid of the corrosion on the inside of the fender.  I then placed the fender back on the bike and took another picture.  This time you could see my reflection in it.


We don't know yet whether we're going to keep the fender as it is or cut it to a new shape.  We probably need to keep a portion of the fender in order to properly mount the new tail light (another fabrication issue that requires some careful consideration).  But right now the fender doesn't fit the overall flow of the bike's profile very well.

Another issue is the new tail section's interaction with the rear blinkers.  At this point it looks like the blinkers have to be removed in order for the new tail section to fit properly.  This actually works to make attaching the tail section easier, as it provides mounting points where the blinkers are now.  The problem is that if the rear blinkers are removed then the front blinkers must also be removed in order to pass inspection (no blinkers is ok, half of them is not ok).  The front blinkers are attached to a post which is welded to the frame, and we had hoped to avoid cutting the frame.

This is an interesting portion of the project.  There are several potential solutions to the fabrication hurdles, and we have to determine which is the most appropriate.  I have a feeling that much of the time spent on this project in the near future will involve sitting and staring and occasionally moving a couple of things around.  We haven't yet made any final decisions regarding final fabrication.

We had a little bit of time after working on the rear fender so we re-built the throttle.  Unfortunately we ran out of time before we could slip on the new grip and mirror.  This did not stop me from convincing Megan to take a few pictures of me sitting on the bike with the new tail section.


I am very excited about the overall look of the bike and the new riding position is frankly ideal.  I have always been excited to see how this bike would finally look, but now I am equally excited to find out how this bike finally rides.