Monday, September 10, 2012

After...

Tonight I took the Cafe Racer for my first ride.  But first I put it in front of the same brick wall where I took pictures right after I bought the bike and I took some of the same photos.  That was the "before," here is the "after."

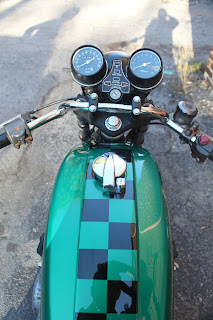
The tank is now so glossy you can see my reflection in it.


Here is the profile which features the tail pipe I spent an afternoon polishing.  The previous owner, who saw the bike tonight at Vintage Bike Night, thought I had purchased a new one.


The handlebars are nice and low, which I think creates a more aggressive stance.


This pictures shows off the seat and the paint job a little more.

And here is one with me, the bike and Griffin, the shop dog.  He's a sweet dog, and he has seen a lot of the build process.


The 400cc engine would require a lot of revving to get it up to highway speeds, so this will be a surface street motorcycle.  But this was never meant to be a highway bike; it's talent is its agility.  This thing loves winding its way down the road.  Tonight was my first opportunity to ride it more than a short distance and I was nervous about the new handlebars.  I didn't know if they would wreck the balance or the handling.  Fortunately, I could not be happier with how it feels.

The engine has more pep than I expected also.  Between 3,000 and 5,000 RPM it accelerates pretty well.  It helps that 45 mph on this bike feels about the same as 75 mph on my CB750.

There are still a couple of things I would like to do, but it is all cosmetic.  I would like to re-chrome the pipes, and the engine could use a good cleaning.  But for now it is fun little bike and it looks just like the image I had in my head when I bought it in January.  That being the case, don't expect any updates for a while - I'll be out riding.

Wednesday, September 5, 2012

Just pictures with short descriptions now - more to follow.

First was the installation of the tail light with the new tail section.  That should have been a very easy process, but it ended up being very difficult because of faults in the wiring.


Eric finishing off the light.


More work on the light - good shot of the seat though...


After the light was done we turned to other pressing issues.  Eric re-built the petcock valve.


Finally it was time to place the gas tank back into position, being careful not to scratch any paint.


Then the cafe racer got a new fuel line.


Eric bled the front brake and reconnected everything.


By the end of the night it started and ran well.  It is leaking a little bit of gas out of the carburetor, but that will be a pretty quick fix.  Then it's ready to ride.  Here is how it looks on the lift. 


And here I am seeing how it all feels (it feels great).


Saturday, September 1, 2012

I Have a Seat (for real this time)

This is just a short post to show off my new seat.  The top is black suede (which has been weatherproofed) and both the leather and the seat pan were done by Rich Phillips (www.bikersaddles.com or other leather goods at www.richphillipsleather.com).  I'm really happy with how it looks and feels.

Right now I have an appointment on Wednesday evening to complete final assembly and hopefully there won't be any insurmountable obstacles at that time.  My goal is to ride the Cafe Racer to Vintage Bike Night on September 10.  Fingers crossed that everything runs smoothly on Wednesday!

For now, here are seat pictures:


It looks soft and cushy but has a good amount of firmness.  As you can see in the photo below it also has a low profile.


Sunday, August 12, 2012

Signs of Life

We are getting to the point where there are very few things left before this bike is back to riding.  However, as we get closer to finishing, there are fewer and fewer items which I can complete on my own.  One of the things on that list was rewiring the bike - something that became necessary the minute we changed the handlebars, refurbished the headlight and removed the blinkers.  Electrical work is very different from mechanical work, but fortunately we had a guide:


I'm glad someone can made sense of that because it looks illegible to me.  The truth is that I will not be in any of the pictures you see in this post because the work was done by people with much better skills than mine.

Before we got to that point, we still had to repaint the headlight bucket, returning it to a nice glassy black after years of fading.  I tried to paint it myself no less than 3 times, never once managing to do so without leaving it drippy and uneven.  Finally I re-primed it, sanded it, cleaned it and then Teresa from Flying Tiger painted it.  I did ok when I was painting metal pieces, but for some reason I was totally unable to paint plastic.  Finally they just took the can out of my hands to keep me from hurting myself.


A few days later Eric took time to start fixing wires, a time-consuming and occasionally tedious process.  At this point all I could do was watch while the jumble of multicolored wires slowly transformed back into a working motorcycle.


They started by the gas tank, testing and connecting.


Many of the wires connect through the headlight sitting right behind the lamp itself.  Eventually we were able to mount the headlight bucket and pull the appropriate wires through.


Soon the wires started coming together and looking more organized.


I decided to do something useful that I knew I could accomplish on my own, so I took the chrome ring which holds the headlight together and polished it with steel wool.  Then I took the screws which hold the headlight together and cleaned off the rust using the shop's wire wheel.  Below is a picture of the screws before and after ("before" is on the right, I guess I will be in one picture).


Before I knew it the Cafe Racer was showing signs of life.  The headlight, tail light, instrument cluster and hand controls all functioned perfectly.  I took the picture below with the headlight shining.


There remains very little left to do, but the one obstacle still looming is putting a seat on the tail section.  I have tried a few different vendors without success.  Progress on that front will have to wait for a later update.  Once that seat is done all that really remains is reattaching the front brake and putting the painted pieces back onto the bike.  Then it will be time to ride.

Sunday, July 8, 2012

Multiple Failures

Often it is necessary to fail a few times before the path to success becomes evident.  This principle was on full display this week.

We have done our best during this project to avoid altering any of the stock pieces of the motorcycle.  So far we had been able to alter the look of the bike by simply adding and removing parts, but we knew that one piece which would require some alteration was the bracket which holds the headlight and front blinkers.  Unfortunately, the portion of the bracket which holds the headlight bent when it was unbolted from the frame, so we also needed to weld the bracket to reinforce it.

The first step was to cut away the pipe which holds the blinkers.  We only had one chance to get it right, so Eric did the cutting.


And the welding, and the grinding. 


In the end we had a part which was ready to be sandblasted and painted, even if it was a little out of shape.  (Apologies for the slightly blurry picture.)


So we put it back on the bike to make sure everything still fit correctly, and this happened:


We had spent a lot of time working on that part, so we were upset with that outcome.  Eric was undeterred and he went into the shop to find another piece that might work.  He found a headlight bracket from a different donor motorcycle which looked like it might fit, but which also needed alteration.  This time I did the cutting and grinding, removing tabs which were meant to hold the blinkers and a bridge along the top of the bracket.  I made Eric take pictures of this process because I didn't think anyone I knew would believe me if I told them that I used a cutting wheel and grinder.


Here is a picture of the bracket with the pieces we removed to try and make it fit onto the motorcycle frame.


Next we bolted the new bracket onto the bike to make sure it fit properly.  And it fit the frame exactly as we intended... but the headlight didn't fit at all.  The plastic "bucket" which holds the headlight is too deep and because the wiring runs through that bucket we couldn't afford to lose any room.  It quickly became apparent that even though we had spent a lot of time on this part, it simply wasn't going to work.

Eric's next plan was an attempt to find a different headlight which was not as deep, thus allowing us to use the second bracket.  Eric pulled three or four headlights from the parts area and we started holding them up to the bracket in the hopes that they fit.  One of the headlights already had something attached:


As soon as we saw it we realized that we had taken then entirely wrong approach to mounting the headlight.  We didn't need the bracket at all - we could ditch it entirely and use the arms which attach directly to the front forks.  It is simple, it is clean and it is a complete solution to our problem.  We bought a new pair for use on my bike and I mounted them a couple of days later.  It took about 10 minutes.  (They are not in their final position in the photo, we need to position the headlight and adjust them accordingly.)


In the end we did about 3 hours of work and threw away everything we produced.  But it was worth the time spent in order to see the perfect solution.


Sunday, June 3, 2012

Back from the Painter

Earlier I took my gas tank, tail section and side covers to Darren Liquid Illusions to be painted.  It took a few weeks, but they are back!  And they look great!  Here are the pictures:

Here are all of the parts together.  They are really glossy so it is hard to take a good focused photo that captures the color.


Here are the side covers.  I had Darren put the number 17 on each side.  Why number 17?  Because that's my number.  I don't really have a better reason.


From here you can see the checkerboard design that goes along the spine of the bike.


Here is the gas tank.


From here you can see the Flying Tiger logo a bit better.


The contours of the tank provide nice lines for the checkerboard.


The checkerboard continues along the tail section.


Here is the entirety of the tail section.


Here is the tail section from the back.  The hole is for the tail light.


I can't wait to see these parts back on the bike.  I think the color is going to really pop in the sunlight.  With any luck we'll be doing final assembly soon, but first we need to work out the headlight.

Tuesday, May 1, 2012

I Have a Seat! kind of.

As I have mentioned before, we have gotten to the point where there is very little I can do on my own on this project.  In order to make sure I don't take time away from normal working hours at the shop, Eric has agreed to stay at the shop after hours on occasion so that he and I can work exclusively on the cafe project.  This is an extremely generous use of his time and I'd be mired without it.

Consequently, you're going to see Eric doing a lot of the work in the pictures too.  You'll have to rest assured that I was both present and helping to the best of my abilities, but we decided that things that were permanent and external should be done by an expert.

Tonight's priority was mounting the tail section to the frame of the bike and determining the best way to mount the tail light.  We decided that the most simple (and most elegant) solution would be to use the already existing hardware which held the stock seat to the bike.  This seemed to be how the manufacturer of the tail section envisioned it attaching as well, as there were dimples on the tail section which corresponded with the stock hardware.  Still, we did not use the manufacturers drilling locations, choosing instead to measure ourselves.  Then we made our first permanent modification to the tail section of the night.


After drilling all of the holes we used rivets to attach the stock hardware to the tail section.  The tops of the rivets will eventually be covered by the upholstered seat.  The added benefit of attaching the tail section this way is that if we need to access the area under the seat or we need to remove the tail section (as is important for several routine maintenance tasks) we can simply use the stock hinge to lift the tail section.


After successfully attaching the tail section, the next step was to figure out how we wanted the tail light to attach to the bike.  We considered several options, including cutting the stock fender and using it as a platform for mounting the light, but we decided that the bike would look cleaner if we abandoned the back fender altogether and mounted the tail light directly on the tail section.

The tail light had a bracket where it was meant to attach to the fender, so that was the first to go.  Eric used the cutting wheel to reshape the bracket.  The flying sparks made me feel like I was on one of those bike build tv shows (haven't you noticed that sparks are always flying in the promos for those shows?).


Next it was time to mark where we wanted to drill the back of the tail section.  We're inserting the back of the light fixture (where the wires come out) into the fiberglass so that it sits flush on the back of the bike (making it look like it was built into the fiberglass).  We needed to cut a hole 1/2 of an inch in diameter for this to work and we wanted to make sure it was centered.  We measured using calipers and Eric drilled the hole. 


The measurements were perfect and we now have tail light which is cleanly mounted into the fiberglass.


All of this fabrication was huge progress for the project.  The gas tank, side covers and tail section will be ready for paint this week.  While they are being painted (a process which may take between 6 and 8 weeks) we will rebuild the headlight bracket and rewire the bike.  I'll send the tail section to the upholsterer as soon as it gets back from paint to have the seat made, then it'll be a simple matter of assembly.